To set up Microsoft Clarity, sign up at the official Microsoft Clarity website, create a new project, then install the tracking code on your website — either via the WordPress plugin, Google Tag Manager, or by pasting it manually into your site’s
. The entire process takes around 20 minutes and data starts appearing within a few hours.I’d been running my website manwithmanycaps.com for a while before it hit me: I had absolutely no idea what people were actually doing once they landed on my pages. Google Analytics told me they were arriving. It couldn’t tell me why they were leaving.
That’s a frustrating place to be. I’d spent time redesigning a landing page that still converted at under 2%. I’d guessed at the problem, changed colours, rewritten headlines — and still nothing. The real issue? I was making decisions based on traffic numbers instead of actual visitor behaviour. That’s like trying to fix a leaky pipe by reading your water bill.
In this guide, I’ll walk you through how to set up Microsoft Clarity step by step — the exact process I used to get it running across multiple sites, including the verification trick and GDPR settings most guides skip entirely. We’ll cover five steps: create your account, grab your tracking code, install it on your platform, verify it’s actually firing, and configure privacy settings so you’re GDPR-compliant from day one.
If you are wondering how to set up Microsoft Clarity, the process is completely free and takes about 20 minutes across WordPress, GTM, or Shopify.
- It costs nothing: No paid tiers, no traffic limits — all features are free (Microsoft Learn, 2026)
- 5 steps to get started: Create account → Get code → Install → Verify → Configure privacy
- Use The Clarity Verification Framework to confirm data is actually recording before you walk away
- GDPR matters: Configure masking settings before your first visitor is recorded
- Works everywhere: WordPress plugin, Google Tag Manager, Shopify, and manual HTML
What You’ll Need Before You Start
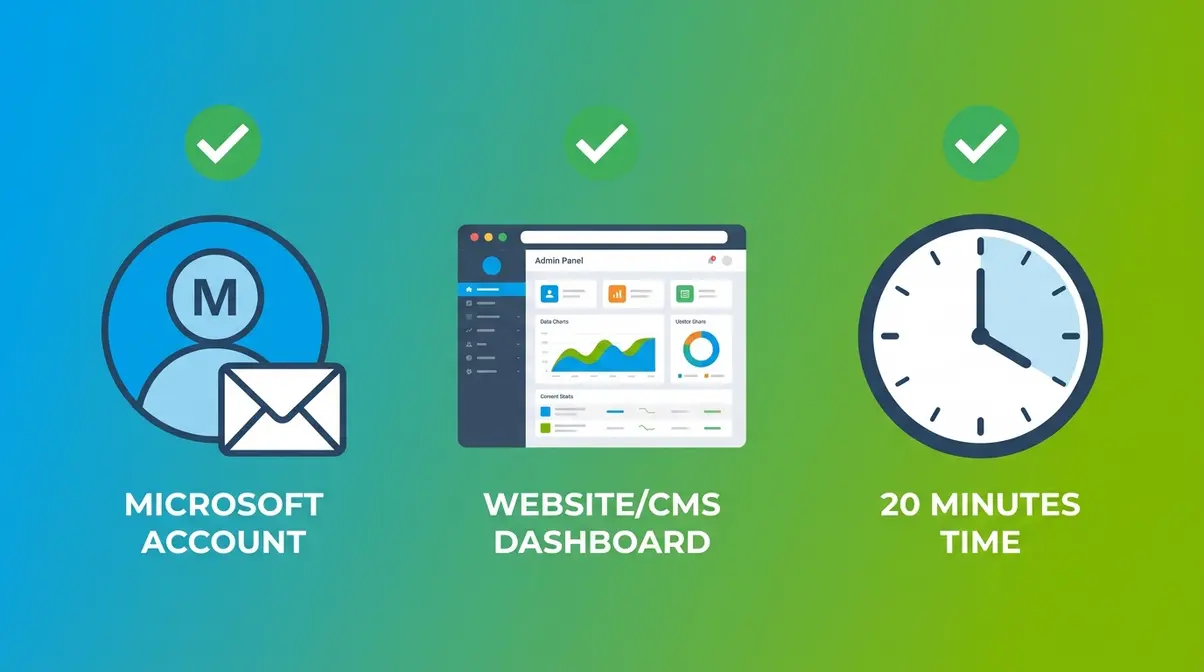
You need three things before you start: a Microsoft account, access to your website’s backend or CMS, and about 20 minutes. That’s it. No coding knowledge required, no credit card, no existing analytics setup needed.
Creating a Free Microsoft Account
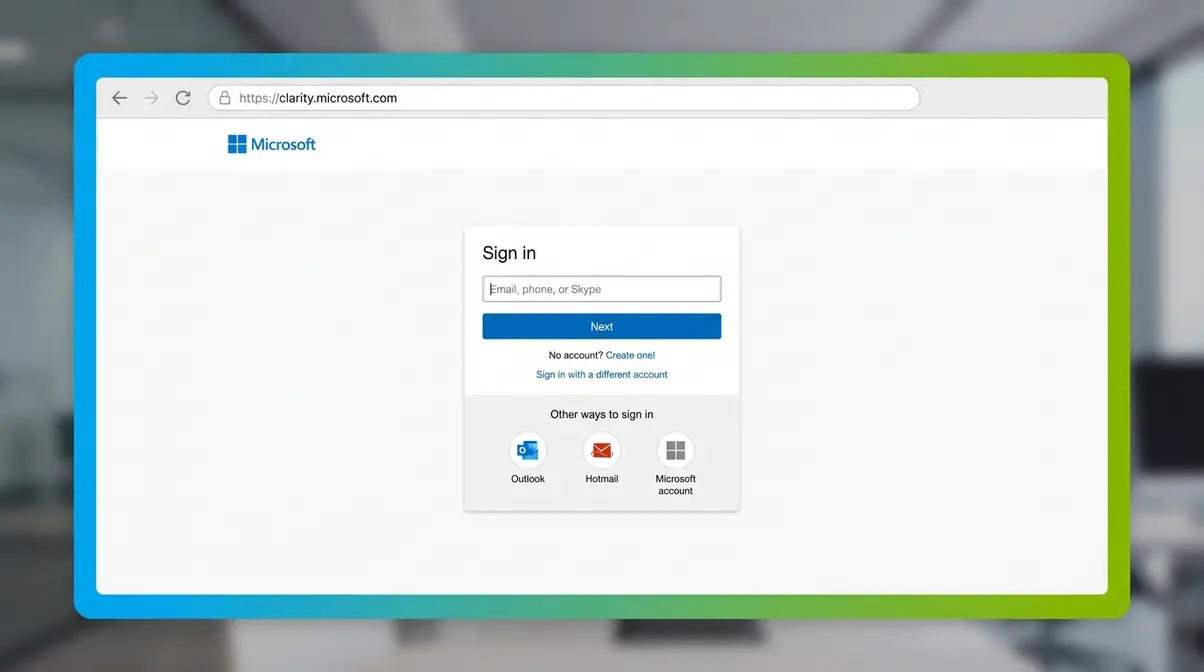
You almost certainly already have a Microsoft account. If you’ve ever used Outlook, Hotmail, Xbox Live, or Office 365, you’re already set — sign in with those credentials at clarity.microsoft.com and you’re good to go.
If you don’t have one, head to the Microsoft account creation page and create a free account. It takes about two minutes. Use an email you check regularly, because Clarity will send project notifications there.
How Does Microsoft Clarity Work?
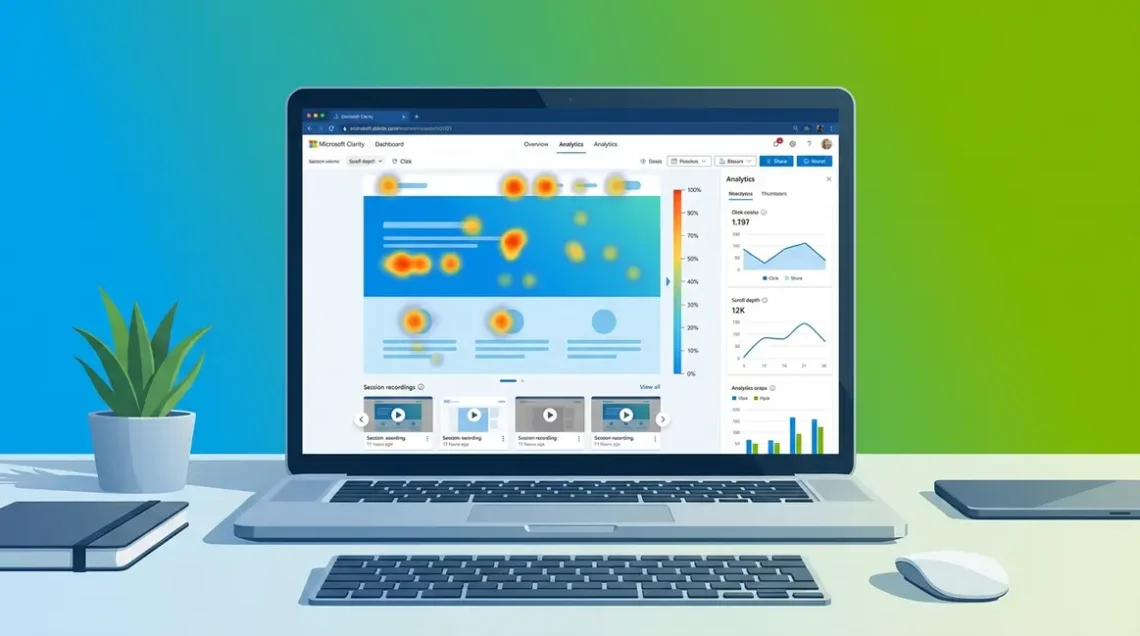
Microsoft Clarity is a free heatmap and session recording tool from Microsoft that shows you exactly how real visitors interact with your website. Clarity works by placing a small JavaScript snippet in your website’s
that records visitor interactions in real time. When a visitor lands on your site, the script captures mouse movements, clicks, scroll depth, and navigation behaviour, then sends that data to Microsoft’s servers. Clarity processes the data into heatmaps (colour-coded overlays that show where people click, tap, and scroll) and session recordings (video replays of individual visitor journeys).When Microsoft launched Clarity, it positioned the tool as a completely free alternative to premium heatmap software with no traffic limits (Search Engine Land). That positioning hasn’t changed. As of 2026, there are no paid tiers, no session recording limits, and no features locked behind a paywall (Microsoft Learn, 2026).
Why is it free? Microsoft uses anonymised, aggregated data to improve its own products and AI research. You get the tool; they get research data. It’s a reasonable trade for most site owners.
- What you’ll see once it’s installed:
- Where visitors click (and where they click on things that aren’t links — a surprisingly common frustration signal)
- How far down the page they scroll before leaving
- Session recordings showing rage clicks, dead clicks, and quick backs
- A dashboard summarising engagement, scroll depth, and session counts
Step 1: Create Your Clarity Project
Creating your Clarity account is the starting point for everything that follows. The sign-up process is straightforward — but there are a few project settings worth getting right from the beginning, especially if you’re planning to add team members later.
Creating Your Clarity Account
Go to clarity.microsoft.com and click Get started free. Sign in with your Microsoft account. You’ll land on the Clarity dashboard for the first time — it’ll be empty, which is normal.
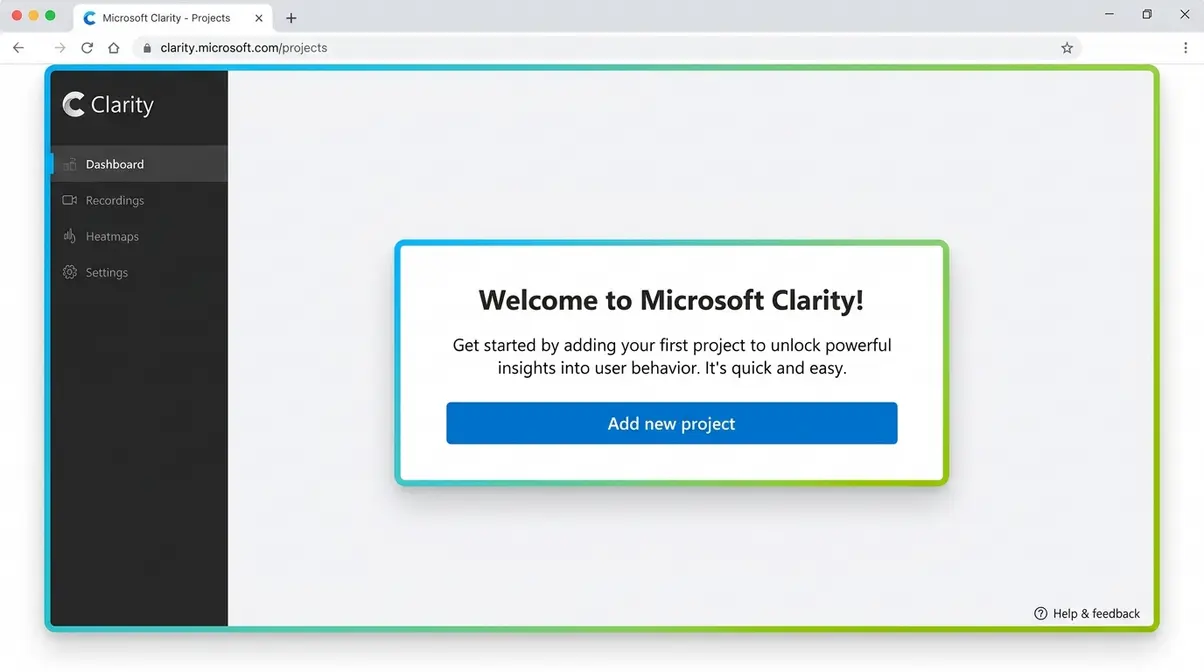
Setting Up Your First Project
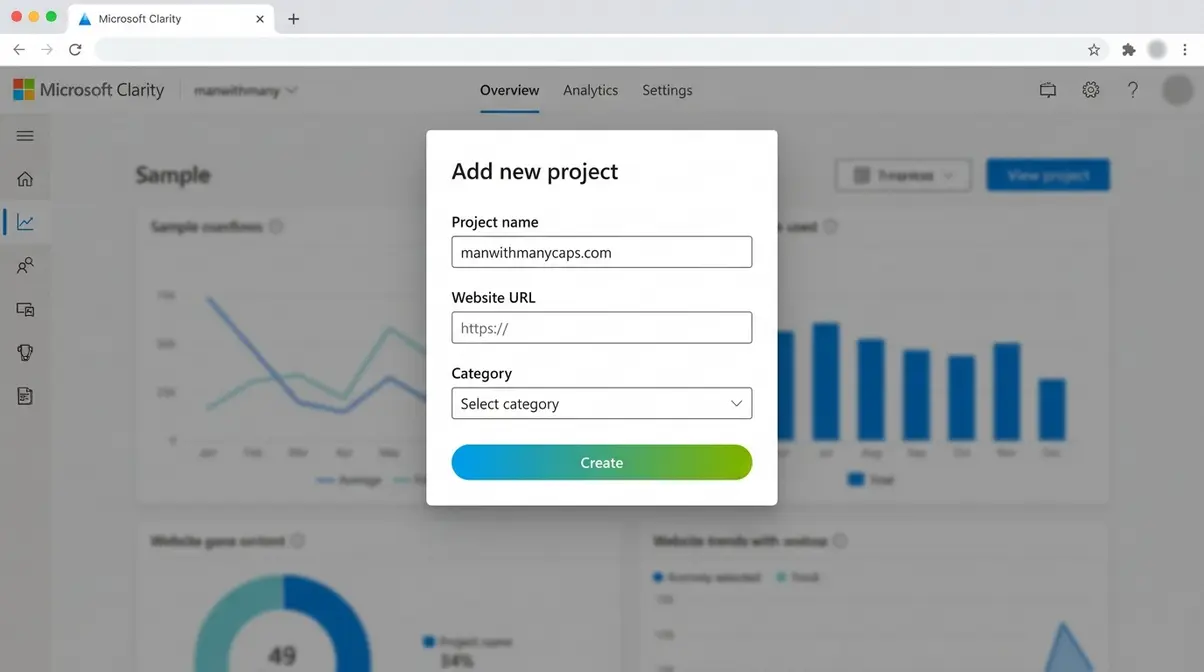
Click Add new project. You’ll be asked for:
- Project name — use your website name or domain (e.g., “manwithmanycaps.com”)
- Website URL — enter your full domain including https://
- Category — choose the option that best describes your site (blog, e-commerce, etc.)
Click Create. Clarity generates a unique tracking code (the small snippet of JavaScript that tells Clarity to start recording visitor behaviour on your site). You’ll need this in Step 2.
Adding Team Members to Your Project
If you work with a developer, VA, or co-founder, you can give them access without sharing your login. Inside your project, go to Settings → Team. Enter their email address and choose their role:
- Admin — full access including settings and billing
- Member — can view data but can’t change settings
They’ll receive an email invitation. This is also how you’d grant a client access to their own Clarity data without handing over your account credentials.
✓ Checkpoint: You’ve created a project and can see your Clarity project dashboard. The tracking code is ready to copy. Move to Step 2.
Step 2: Get Your Clarity Tracking Code
Inside your project, click Setup in the left sidebar. You’ll see your unique tracking code — a block of JavaScript that looks something like this:
<script type="text/javascript">
 (function(c,l,a,r,i,t,y){
 c[a]=c[a]||function(){(c[a].q=c[a].q||[]).push(arguments)};
 t=l.createElement(r);t.async=1;t.src="https://www.clarity.ms/tag/"+i;
 y=l.getElementsByTagName(r)[0];y.parentNode.insertBefore(t,y);
 })(window, document, "clarity", "script", "YOUR_PROJECT_ID");
</script>
Your YOUR_PROJECT_ID will be a unique alphanumeric string — something like abc123xyz. Keep this tab open; you’ll copy this code in the next step.
Learning exactly how to set up Microsoft Clarity correctly hinges on this exact snippet. It acts as the bridge between your website and Microsoft’s servers, capturing every scroll, click, and interaction. If you ever lose this code or need to reinstall it later, you can always navigate back to the Setup tab in your dashboard to retrieve it. You don’t need to understand the JavaScript itself, but you do need to copy it exactly as it appears without missing any brackets.
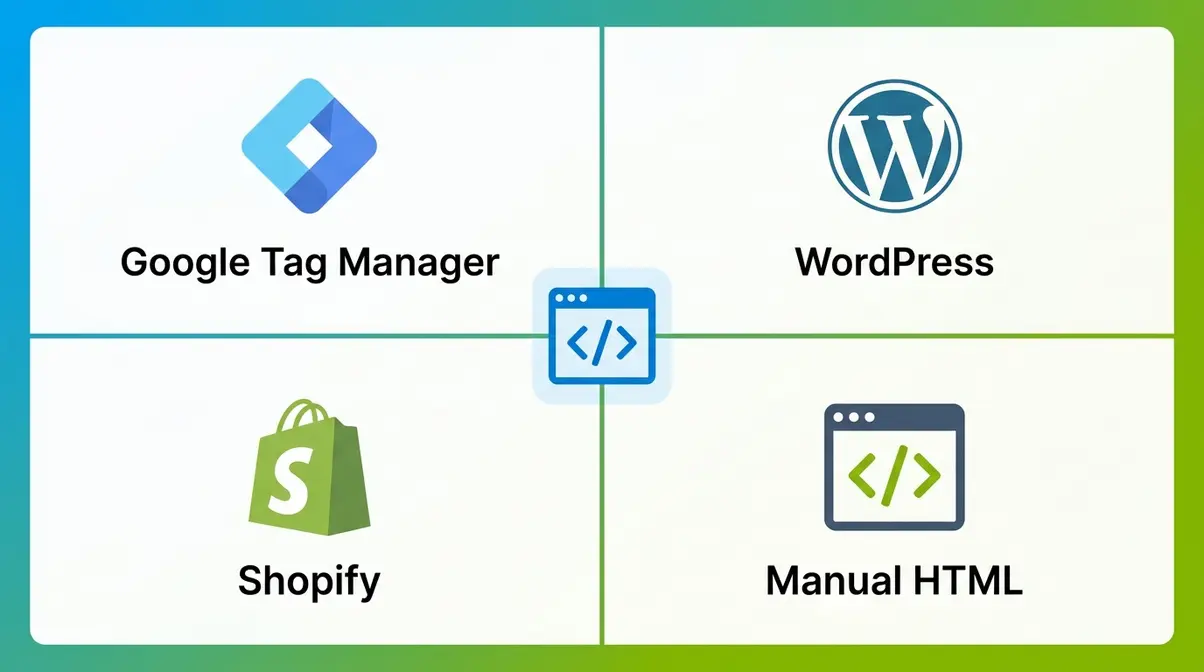
Clarity also gives you four installation options directly on this screen: Google Tag Manager, WordPress, Shopify, and Get the code (manual). Choose the method that matches your platform.
✓ Checkpoint: You can see your tracking code and have chosen your installation method. Move to Step 3.
Step 3: Install the Tracking Code on Your Website
This is where most guides lose people. There are four distinct ways to install the Clarity tracking code, and the right one depends entirely on your platform. I’ll walk through each one.
“✓ Step 1: Create a Microsoft Clarity Account … Once done, you’ll get a unique Clarity tracking code. ✓ Step 2: Install Clarity on Your Website.” — This is the bit where most tutorials stop. We’re going further.
Method 1: Google Tag Manager
Google Tag Manager (GTM) is a free tool from Google that lets you add tracking scripts to your site without editing any code directly. If you already use GTM, this is the cleanest installation method.
- Log in to the Google Tag Manager dashboard and open your container
- Click Tags → New
- Click Tag Configuration and select Microsoft Clarity from the tag type list (it’s a built-in template as of 2026)
- Paste your Clarity Project ID into the Project ID field
- Under Triggering, select All Pages
- Click Save, then click Submit to publish the container
For the full GTM walkthrough, see Microsoft’s official GTM integration guide.
✓ Checkpoint: Your GTM container is published with the Clarity tag. Move to Step 4 to verify it’s firing.
Method 2: The WordPress Plugin
The WordPress plugin is the easiest method if you’re running a self-hosted WordPress site. No code editing required.
- In your WordPress admin, go to Plugins → Add New
- Search for “Microsoft Clarity”
- Click Install Now, then Activate
- Go to Settings → Clarity
- Paste your Project ID (not the full code — just the ID string) into the field
- Click Save
The plugin handles everything else. It automatically inserts the tracking code into your site’s
on every page. You can find the official plugin at the WordPress Plugin Directory.✓ Checkpoint: Plugin is active and Project ID is saved. You should see “Connected” status in the plugin settings.
Method 3: Adding the Code to Shopify
Shopify doesn’t use a plugin system for scripts, but the installation is still straightforward.
- In your Shopify admin, go to Online Store → Themes
- Click the three-dot menu next to your active theme and select Edit code
- In the left sidebar, open Layout → theme.liquid
- Find the closing tag
- Paste your full Clarity tracking code immediately before
- Click Save
✓ Checkpoint: Code is saved in theme.liquid. Head to Step 4 to confirm it’s recording.
Method 4: Manual HTML Installation
For custom-built sites, static HTML sites, or any platform not covered above, you’ll paste the code directly into your site’s HTML template.
- Open your site’s main HTML template file (often index.html, header.php, or a base template)
- Locate the closing tag
- Paste your full Clarity tracking code immediately before
- Save and deploy the file
This method works for any platform — including Wix, Squarespace (via code injection), Webflow, and custom-domain setups. The key rule: the code must appear in the
section of every page you want to track.✓ Checkpoint: Tracking code is live on your site. Now verify it’s actually working before you walk away.
Step 4: Verify Clarity Is Recording
Here’s the step I skipped on my first install — and I paid for it with two weeks of missing data. Don’t make the same mistake. Verification takes five minutes and confirms the tracking code is actually firing before you close the laptop.
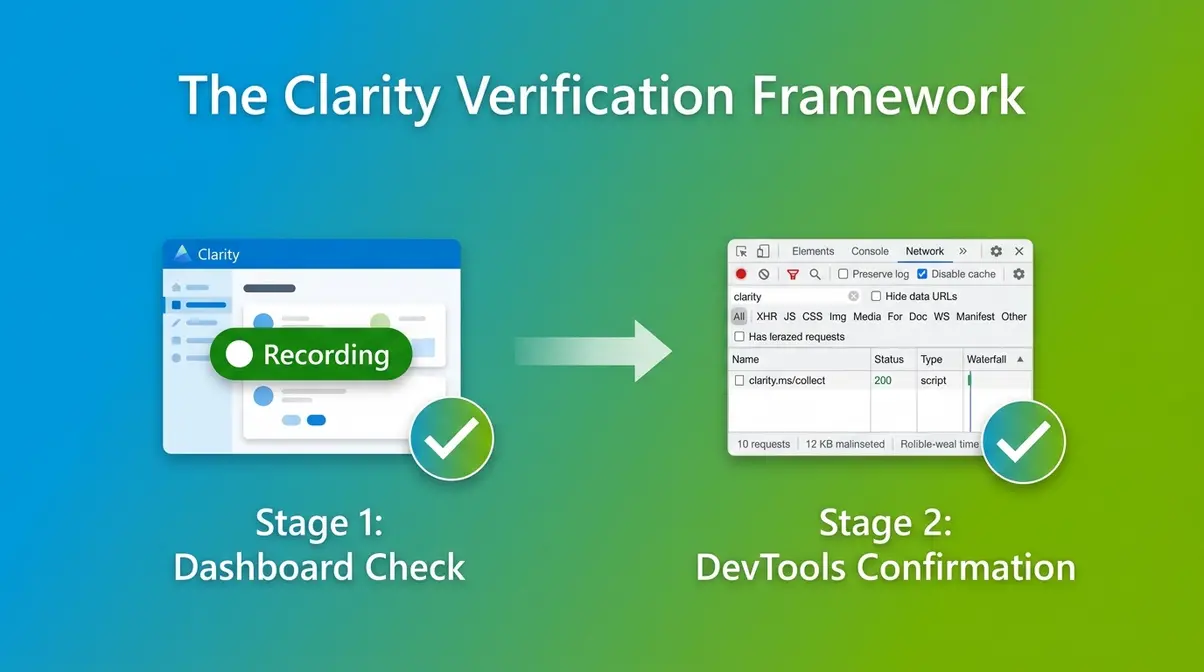
This is where The Clarity Verification Framework comes in: a two-stage check that confirms (1) the Clarity dashboard shows your project as active, and (2) Chrome DevTools confirms the script is sending data. Both stages matter. The dashboard check alone isn’t enough.
Checking the Clarity Dashboard
After installing the code, return to your Clarity project dashboard. Look for one of two indicators:
- A green “Recording” badge next to your project name
- A notification that says “We’ve detected your tracking code”
If neither appears immediately, don’t panic. Clarity can take up to two hours to detect a newly installed code, and up to 24 hours for the first session data to populate your dashboard. Visit your own website in a separate browser tab after installing — that visit often triggers the initial detection.
Confirming the Script in DevTools
The dashboard check is reassuring but passive. The DevTools check is definitive. Here’s exactly how to run it:
- Open your website in Google Chrome
- Press F12 (or right-click → Inspect) to open Chrome DevTools
- Click the Network tab
- In the filter bar, type clarity
- Refresh your page
- Look for a network request to www.clarity.ms/collect
If you see a request to collect with a 200 status code, the script is firing and data is being sent to Microsoft’s servers. That’s your confirmation.
If you see no collect request at all, the script isn’t loading. Jump to the Troubleshooting section. If you see a collect request with a 4xx error, there’s likely a configuration issue with your Project ID.
✓ Checkpoint: Dashboard shows “Recording” status AND DevTools confirms a collect request with 200 status. The Clarity Verification Framework is complete. You have verified, working data collection. Move to Step 5.
Step 5: Configure Privacy Settings
Getting Clarity installed is one thing. Making sure it’s handling visitor data responsibly is another — and it’s not optional if your site has visitors from the EU or California. I configure privacy settings before I drive any real traffic to a new install.
Clarity’s Masking Options
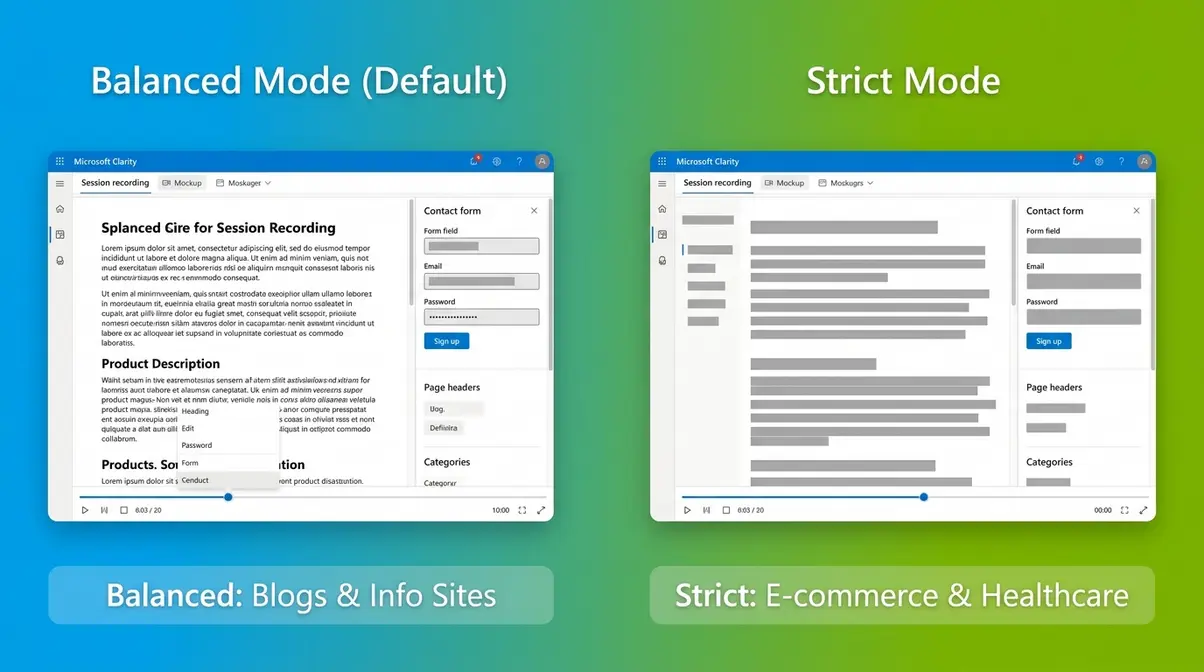
Clarity offers two built-in masking modes that control which content gets obscured in session recordings (Microsoft Learn, 2026):
| Masking Mode | What It Does | Best For |
|---|---|---|
| Strict | Masks ALL text on the page — every word, number, and input field appears as blocks | GDPR-sensitive sites, e-commerce, healthcare |
| Balanced (default) | Masks only sensitive inputs (passwords, credit card fields, form data) | Most blogs, informational sites, portfolios |
For most bloggers and small business sites, Balanced is the right choice — it protects personal data without obscuring the text content you need to see in recordings. If your site collects any personal information beyond basic contact forms (medical data, financial details, user accounts), switch to Strict.
To change the masking mode: Settings → Masking → Select your preference → Save.
Using the data-clarity-mask Tag
Sometimes you need more granular control — masking a specific section of a page without blinding the entire recording. The data-clarity-mask HTML attribute lets you do exactly that.
Add it to any HTML element you want to obscure:
<div data-clarity-mask="True">
 This content will be masked in all Clarity recordings.
</div>
Common use cases: user profile sections, order summaries, personalised pricing displays, or any element that might show personally identifiable information (PII — any data that could identify a specific individual, such as a name, email, or address).
You can also unmask a specific element within a Strict-mode page using — useful when you need to see navigation behaviour in an otherwise fully masked recording.
Under the UK GDPR (retained post-Brexit) and EU GDPR, you are responsible for ensuring that session recording tools do not capture personal data without a lawful basis. Masking is your primary technical control. For authoritative guidance on what constitutes personal data, see GDPR.eu’s definition resource.
Linking Clarity to GA4
Connecting Clarity to GA4 is genuinely useful — it lets you jump from a GA4 segment (say, users who bounced on your pricing page) directly into the Clarity session recordings for those users. It’s one of the more powerful features in the tool.
- In Clarity, go to Settings → Integrations → Google Analytics
- Click Connect to Google Analytics
- Sign in with the Google account that has access to your GA4 property
- Select your GA4 property from the dropdown
- Click Save
Once connected, Clarity adds a custom dimension to your GA4 events, and a “View Recordings” link appears directly in GA4 session data. Data sync typically takes 24–48 hours after initial connection.
✓ Checkpoint: Masking is configured, data-clarity-mask applied where needed, and GA4 is connected. Your Clarity setup is complete and compliant.
Troubleshooting 8 Common Issues
Across the sites I manage, these are the eight most common failure scenarios I’ve encountered — and what to do about each one.
The Code Isn’t Firing (Problems 1–3)
Problem 1: The tracking code is on the wrong page
The most common mistake I see. The Clarity code must appear in the
Problem 2: A caching plugin is serving stale HTML
If you’re on WordPress and use a caching plugin (WP Rocket, W3 Total Cache, LiteSpeed Cache), the old cached HTML might not include your newly added Clarity code. Go to your caching plugin and click Clear All Cache after installing Clarity. Then run the DevTools check again.
Problem 3: A Content Security Policy (CSP) is blocking the script
A Content Security Policy (CSP) is a security header that tells browsers which scripts are allowed to run on your site. If your host has a strict CSP configured, it may block clarity.ms from loading. Check the Console tab in Chrome DevTools for errors mentioning “Content Security Policy” or “clarity.ms.” The fix is to add clarity.ms to your CSP’s script-src and connect-src directives — your developer or host can do this.
Data Isn’t Appearing (Problems 4-6)
Problem 4: It’s only been a few hours
Clarity takes up to 24 hours to populate your dashboard with initial session data. The “Recording” badge may appear within two hours, but the heatmaps and session recordings often take longer to show up. If you’ve just installed it, wait a full day before troubleshooting further.
Problem 5: You have very low traffic
Clarity requires a minimum number of sessions before it generates heatmaps — typically around 30 sessions. If your site gets fewer than 30 visitors a day, heatmap data will accumulate slowly. Session recordings appear more quickly (individual sessions are captured in near real-time). Check the Recordings tab first; if you see sessions there, the installation is working correctly even if heatmaps are sparse.
Problem 6: You’re looking at the wrong date range
This one catches people out. The Clarity dashboard defaults to the last 7 days. If you installed Clarity yesterday, make sure the date range includes today. Click the date filter in the top right of the dashboard and select Last 24 hours or a custom range that includes your install date.
Platform-Specific Issues (Problems 7–8)
Problem 7: WordPress plugin showing “Not Connected”
If the Clarity WordPress plugin shows a “Not Connected” status, the most common cause is a Project ID mismatch. Go back to your Clarity project dashboard, copy the Project ID from the Setup page (it’s the short alphanumeric string, not the full JavaScript snippet), and re-paste it into the plugin settings. Make sure there are no spaces before or after the ID. Save and check again.
Problem 8: Shopify — code not appearing on all pages
Some Shopify themes use multiple layout files for different page types (product pages, collection pages, checkout). If you only added the Clarity code to theme.liquid, it may not apply to checkout pages (Shopify restricts third-party scripts on checkout by default on non-Shopify Plus plans). For standard Shopify plans, tracking on the checkout page requires Shopify Plus or using Shopify’s Customer Events feature. Everything outside checkout — homepage, product pages, collections — should track correctly with the theme.liquid install.
Limitations of Microsoft Clarity
No tool is right for every situation. Here’s an honest assessment of where Clarity falls short — and what to use instead.
Clarity’s Main Limitations
What are the limitations of Microsoft Clarity? While it is completely free — no paid tiers, no traffic limits, and no feature restrictions — free comes with trade-offs. Microsoft Clarity’s main limitations are the absence of A/B testing, conversion funnels, form analytics, and data export. It also retains data for only 13 months before deletion.
Clarity does not offer:
- A/B testing or experimentation tools — you can observe behaviour but can’t test variants
- Conversion funnel analysis — no built-in funnel builder for multi-step journeys
- Form analytics — you can see clicks on form fields but not field-level abandonment data
- Custom event tracking — limited compared to GA4 or Mixpanel for tracking specific user actions
- Data export — no direct CSV export of session data or heatmaps (though GA4 integration helps here)
- Data retention beyond 13 months — Clarity stores session data for 13 months; older data is deleted
For behavioural observation — understanding how visitors navigate and where they struggle — Clarity is comprehensive. For most bloggers and small business owners, none of these limitations matter day-to-day. They start to matter when you’re running a conversion-optimised e-commerce site or need enterprise-grade reporting. If you need to run split tests, build multi-step funnels, or collect user feedback via surveys, you’ll need to supplement Clarity with another tool.
Clarity vs Hotjar Comparison
The most common alternative people consider is Hotjar. Here’s the honest comparison:
| Feature | Microsoft Clarity | Hotjar (Free) | Hotjar (Paid from ~$32/mo) |
|---|---|---|---|
| Session recordings | Unlimited | 35/month | From 100/month |
| Heatmaps | Unlimited | 3 active | Unlimited |
| Funnels | ✗ | ✗ | ✓ |
| Surveys & feedback | ✗ | ✓ (limited) | ✓ |
| Form analytics | ✗ | ✗ | ✓ |
| Price | Free | Free | From ~$32/month |
| GA4 integration | ✓ | ✓ | ✓ |
For unlimited recordings and heatmaps at zero cost, Clarity wins outright. Hotjar’s paid tiers add surveys, feedback widgets, and funnels — features worth paying for if you’re running CRO (conversion rate optimisation) campaigns at scale.
For a deeper comparison, see my Microsoft Clarity vs Hotjar review — I’ve run both on the same sites simultaneously and the differences are more nuanced than most comparisons suggest.
When Clarity Is Exactly What You Need
Clarity is the right tool when you’re a blogger, freelancer, or small business owner who wants to understand visitor behaviour without paying for it. It’s the right tool when you want to know why a page isn’t converting, which sections people actually read, and where they give up. It’s the right tool when you’re just starting out with behavioural analytics and don’t need funnel builders or feedback surveys yet.
If you’re running under 100,000 monthly sessions and your primary goal is understanding how people use your site rather than running complex experiments, Clarity gives you everything you need. I use it on every site I manage as the first layer of behavioural data — it costs nothing and the insights are immediately actionable.
Frequently Asked Questions
How do you set up Microsoft Clarity?
Setting up Microsoft Clarity takes five steps and about 20 minutes. Sign up at clarity.microsoft.com using a Microsoft account, create a new project for your website, copy the unique tracking code Clarity generates, install it via the WordPress plugin, Google Tag Manager, Shopify theme editor, or manually in your HTML
, then verify it’s firing using the Chrome DevTools Network tab. Data starts appearing in your dashboard within a few hours of installation.Is Microsoft Clarity really free?
Microsoft Clarity is completely free, with no paid tiers and no feature restrictions. There are no traffic limits, no session recording caps, and no heatmap limits. All features — recordings, heatmaps, dashboard analytics, and GA4 integration — are available at no cost. Microsoft funds the tool using anonymised, aggregated data for its own AI and product research.
How do you give Microsoft Clarity access to someone else?
To give someone else access to your Clarity project, go to Settings → Team and invite them by email. You can assign them either Admin access (full control including settings) or Member access (view-only). They’ll receive an email invitation and can log in with their own Microsoft account. This is the recommended method for sharing access with developers, clients, or team members — no need to share login credentials.
Why would someone need Microsoft Clarity?
You need Microsoft Clarity when traffic data alone isn’t explaining why visitors aren’t converting. Google Analytics tells you how many people visited and which pages they viewed. Clarity shows you what they did on those pages — where they clicked, how far they scrolled, where they got confused or frustrated. For example, rage clicks (rapid repeated clicking on an element) often reveal broken links or UI elements users expect to be interactive. That kind of insight is impossible to get from traffic data alone.
What is the alternative to Microsoft Clarity?
The most direct alternative to Microsoft Clarity is Hotjar, which offers similar heatmap and session recording features. Hotjar’s free plan is more limited (35 recordings and 3 heatmaps per month vs. Clarity’s unlimited), but its paid tiers add surveys, feedback widgets, and funnel analysis that Clarity doesn’t offer. Other alternatives include Lucky Orange, FullStory, and Mouseflow. For sites under 100,000 monthly sessions that don’t need feedback tools, Clarity’s unlimited free tier is difficult to beat. See my full Clarity review for a detailed breakdown.
Start Seeing What Your Visitors Actually Do
Most site owners spend months guessing why their pages don’t convert. The answer is usually visible within the first week of Clarity data — a rage-clicked button, a scroll depth that stops before the call to action, a mobile layout that breaks on certain devices. You just need the tool to show you.
The Clarity Verification Framework — checking the dashboard status first, then confirming the collect payload in Chrome DevTools — is the step that guarantees you’re collecting clean data from day one. Skip it and you might spend weeks analysing recordings that don’t exist, or worse, making decisions based on an incomplete picture.
Ready to get started? Now that you know how to set up Microsoft Clarity, install the tracking code today. Run through the five steps, and let it record for a full week before drawing conclusions. Your first session recording is usually the most surprising. On manwithmanycaps.com, the first thing I saw was a visitor rage-clicking a heading I’d never intended to be a link. One five-minute recording. One immediate fix. That’s the value of seeing your site through someone else’s eyes — and it costs nothing to find out. For a deeper look at what the data tells you once it starts coming in, my Microsoft Clarity review covers what to actually do with what you find.